Using Webjobs in Azure App Service
WebJobs is a feature of Azure App Service that enables you to run a program or script in the same instance as a web app, API app, or mobile app. There is no additional cost to use WebJobs.
Azure Functions provides another way to run programs and scripts. For a comparison between WebJobs and Functions, see Choose between Flow, Logic Apps, Functions, and WebJobs.
Type of WebJob
There are two type of webjobs: Continuous and Triggered
Continuous:
- Starts immediately when the WebJob is created.
- Runs on all instances that the web app runs on.
- Supports remote debugging.
- Code is deployed under
\site\wwwroot\app_data\Jobs\Continuous
Triggered:
- Starts only when triggered manually or on a schedule.
- Runs on a single instance that Azure selects for load balancing.
- Doesn’t support remote debugging.
- Code is deployed under
\site\wwwroot\app_data\Jobs\Triggered.
Creating continuous WebJob
Note: When your source control configured for your application, Webjobs should be deployed as part of the source control integration. WebJob can’t be added from the Azure portal, After source control is configured for your application,
First you should have App Service is created in my case I have created Webappmehzan.
- In the Azure portal, go to the App Service page of your App Service web app, API app, or mobile app.
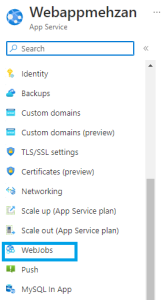
- In the left pane of your app’s App Service page, search for and select WebJobs and Select it.

3. On the WebJobs page, select Add.
4. ill in the Add WebJob settings as specified in the bellow:
Name : mehzanContinuesWebJob, A name that is unique within an App Service app. Must start with a letter or a number and cannot contain special characters other than “-” and “_”.
File Upload : mehzanapp1.zip, A .zip file that contains your executable or script file.
Type: Continuous, The WebJob types are described earlier in this article.
Scale: Multi instance, Available only for Continuous WebJobs. Determines whether the program or script runs on all instances or just one instance
5. Click on OK button
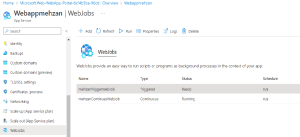
The new WebJob appears on the WebJobs page. press to Refresh button
6. To stop or restart a continuous WebJob, click Stop , Refresh and then Start On the menu.
By pressing to the logs shows statuses and output of mehzanapp1.zip
Creating triggered WebJob Manually
- In the Azure portal, search for and select App Services.
- Select your web app, API app, or mobile app from the list.
- In the left pane of your app’s App Service page, select WebJobs.

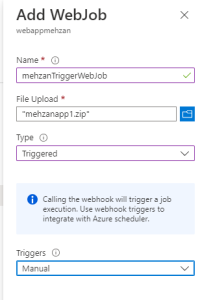
Webjobs for AppService as trigger 4. On the WebJobs page, select Add and fill as following:

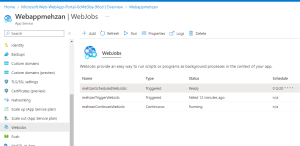
5 press to OK then he new WebJob appears on the WebJobs page. press to Refresh button then you can see the both webjobs:

To run the WebJob, Press Run button on the menu.
Creating scheduled WebJob
Creating schedduled WebJob is similar as Trigger manually, but instead of selecting manually you can select Scheduled and then you should running time by specifing a Cron Expression.
In the following the three types of WebJobs are shown:

Clean up resources
In the preceding steps, you created Azure resources in a resource group ( mehzan07). If you don’t expect to need these resources in the future, you can delete them by deleting the resource group (mehzan07).
- From your web app’s Overview page in the Azure portal, select the mehzan07 link under Resource group.
- On the resource group page, make sure that the listed resources are the ones you want to delete.
- Select Delete, type mehzan07 in the text box, and then select Delete.
Conclusion
In this post we have described WebJobs in Azure App Service and types of WebJobs, and we have showed how to create three type of WebJobs: Continuous, Trigger and Scheduled WebJob in the Azure Portals.
In my next post, I will describe Deploy ASP.NET web app to Azure App Service
This post is part of Azure step by step
