Taxi Fare Prediction
In this post you’ll see how to use ML.NET to predict taxi fares. In the world of machine learning, this type of prediction is known as regression.
This problem is centered around predicting the fare of a taxi trip in a city. At first glance, it may seem to depend simply on the distance traveled. However, taxi vendors in the city charge varying amounts for other factors such as additional passengers, paying with a credit card instead of cash and so on. This prediction can be used in application for taxi providers to give users and drivers an estimate on ride fares.
To solve this problem, we will build an ML model that takes as inputs.
I am going to demonstrate this ML.NET application that trains, evaluates, and consumes a regression model for predicting the price of taxi fare for a particular taxi ride.
prerequisite
- Visual Studio 2022
- .NET 7 (or .NET 6) is installed
Create a Console App and Prepare Your Dataset
Open Visual Studio and create a new .NET console app:
- Select Create a new project from the Visual Studio 2022 start window.
- Select the C# Console App project template.
- Change the project name to TaxiFairePrediction.
- Make sure Place solution and project in the same directory is unchecked.
- Select the Next button.
- Select .NET 7.0 (Standard Term support) as the Framework.
- Select the Create button. Visual Studio creates your project and loads the
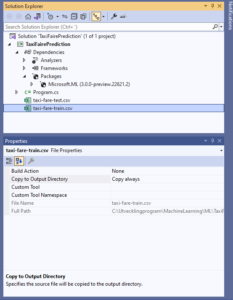
Program.csfile, “Hello World”. - Download the taxi-fare-train.csv and taxi-fare-test.csv datasets from https://aka.ms/code-taxi-train and https://aka.ms/code-taxi-test respectively (save as .csv files) and add them to your solution, making sure to set the Copy to Output Directory property of the datasets to “Copy Always,” in the Visual Studio which is shown in the following figure:

Install ML.NET NuGet Package
You can install by right-clicking on your project, selecting Manage NuGet Packages, and searching for Microsoft.ML in the Browse tab.
Depending on your ML task and type of model, you may need to reference additional ML.NET NuGet packages, but for many common models, including the regression model that you’ll build in this section, you can simply use the core algorithms and transforms from the base Microsoft.ML package.
After adding the ML.NET NuGet package, add the following namespaces to the top of your Program.cs file:
using Microsoft.ML;
using Microsoft.ML.Data;
Now we should implement this App step by step as described from step 1 to step 7.
Step 1: Create ML.NET Environment
You need to create a new ML.NET environment by initializing MLContext.
MLContext is the starting point for all ML.NET operations; it’s a singleton object that contains catalogs, the factories for data loading and saving, transforms (data preparation), trainers (training algorithms), and model operation (model usage) components.
In your Program.cs file, replace the Console.WriteLine(“Hello World”) with the following code to initialize an MLContext:
// 1. Initialize ML.NET environment
MLContext mlContext = new MLContext();
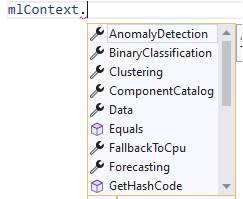
Initializing MLContext creates a new ML.NET environment that can be shared across the model creation workflow objects, as seen in the following figure:

Step 2: Load Data
Next step is load your taxi fare training data (taxi-fare-train.csv) from the CSV file to an IDataView.
Before loading data, we need to create a new class that defines the data schema of your dataset as the model’s input, I name this class ModelInput, and choosing the columns in the dataset to load by adding the following code:
public class ModelInput
{
    [LoadColumn(2)]
    public float PassengerCount;
    [LoadColumn(3)]
    public float TripTime;
    [LoadColumn(4)]
    public float TripDistance;
    [LoadColumn(5)]
    public string PaymentType;
    [LoadColumn(6)]
    public float FareAmount;
}
If you open the file taxi-fare-train.csv via Microsoft Excel and choose the first 7 columns you can se as following figure:

For simplification, I have only use the Passenger Count, Trip Time, Trip Distance, and Payment Type columns as the inputs to the model. You’ll use these input columns, also called Features, to make predictions. You’ll use the Fare Amount column as the column you’d like to predict, also called the Label.
I want to load data from the dataset file into an IDataView using a TextLoader by adding the following as the next line of code in the Program.cs :
// 2. Load training data
IDataView trainData = mlContext.Data.LoadFromTextFile<ModelInput>("taxi-fare-train.csv", separatorChar: ',', hasHeader: true);
By this code our trainData shall be five columns separated with “,” and have the header as the cvs file.
You need add the namespace: using TaxiFairePrediction; to the program.cs class.
You can also directly access a relational database, such as SQL Server, by using a DatabaseLoader; you do this by specifying your connection string and SQL statement in your code, as shown in the following snippet:’
string connectionString = @"Data Source=YOUR_SERVER; Initial Catalog= YOUR_DATABASE;Integrated Security=True";
string commandText = "SELECT * from PricePredictionTable";
DatabaseLoader loader = mlContext.Data.CreateDatabaseLoader();
DatabaseSource dbSource = new DatabaseSource(SqlClientFactory.Instance, connectionString, commandText);
IDataView train Data = loader.Load(dbSource);
When you have your initial dataset configured to be used through an IDataView, you can use the IDataView like normal to perform the typical machine learning steps. You can check out a full sample app that reads data from a SQL Server database at https://aka.ms/code-database-loader.
Step 3: Data Transformations
Machine learning algorithms generally can’t directly use the data you have available for training; you need to use data transformations to pre-process the raw data and convert it into a format that the algorithm can accept.
In this case, PassengerCount, TripTime, TripDistance, and FareAmount are all float values, which is a suitable format for ML algorithms. PaymentType (“CRD,” “CSH,” etc.), on the other hand, is a string value, which isn’t an acceptable format. Thus, you must use the OneHotEncoding data transformation to convert the PaymentType column string values to the acceptable format of numeric vectors.
Add OneHotEncoding, with the PaymentType column as input and a new column named PaymentTypeEncoded as output, by adding the following code in the Program.cs as the next line of code:
// step: 3. Add data transformations
var dataProcessPipeline = mlContext.Transforms.Categorical.OneHotEncoding(outputColumnName:"PaymentTypeEncoded", "PaymentType")
The algorithms in ML.NET by default, process input from a single column named “Features.” Because your taxi fare training dataset doesn’t contain one Feature column with all of the Features included, you need to add one more data transformation to concatenate a new column called Features and combine the PassengerCount, TripTime, TripDistance, and newly encoded PaymentTypeEncoded columns into this new column.
To append this second transformation, add the following code into the Program.cs to the line after the first data transformation:
.Append(mlContext.Transforms.Concatenate(outputColumnName: "Features", "PaymentTypeEncoded","PassengerCount", "TripTime", "TripDistance"));
step 4: Algorithms
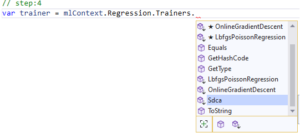
Now that we’ve added the data transformations, it’s time to select an algorithm. You can use several different algorithms for the regression task, as shown in the following figure:

In this case, add the LightGbmTrainer, specifying the FareAmount column as your Label, and the Features column as your Features by adding the following as the next line of code in Program.cs:
//step: 4. Add algorithm
var trainer = mlContext.Regression.Trainers.LightGbm(labelColumnName: "FareAmount", featureColumnName: "Features");
var trainingPipeline = dataProcessPipeline.Append(trainer);
You need to install Microsoft.ML.LightGbm package too.
At a high level, the Light GBM (Light Gradient Boosting Machine) regression trainer uses tree-based learning and can quickly and efficiently train large amounts of data to produce an accurate model.
Step 5: Model Training
The data transformations and algorithms you’ve specified up to this point don’t actually execute until you call the Fit() method (because of ML.NET’s lazy loading approach). The Fit() method executes training and returns a trained model.
Add the following code as the next line in Program.cs to fit the model on your training data and return the trained model:
// 5. Train model
var model = trainingPipeline.Fit(trainData);
Step 6: Model Evaluation
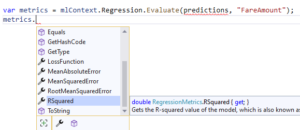
After model training, you can use ML.NET’s evaluators to assess the performance of your model on a variety of metrics. As seen in the following figure, each ML task has its own set of evaluation metrics.

To estimate our model, we’ll look at a common metric for evaluating regression models called R-Squared, which measures how close the actual test data values are to the values predicted by the model. The closer R-Squared is to 1, the better the quality of the model.
To evaluate your trained model, you must load your test dataset into an IDataView, make predictions on the data using the Transform() method, use the regression task Evaluate() function, and print the R-Squared metric by adding the following as the next lines of code in Program.cs:
// 6. Evaluate model on test data
IDataView testData = mlContext.Data.LoadFromTextFile<ModelInput>("taxi-fare-test.csv", separatorChar: ',', hasHeader: true);
IDataView predictions = model.Transform(testData);
var metrics = mlContext.Regression.Evaluate(predictions, "FareAmount");
Console.WriteLine($"Model Quality" + $"(RSquared):{metrics.RSquared}");
Test the program by pressing to F5 in Visual Studio.

As you see in the figure above the Evaluated value for Model is:0.6835090945701794
Step 7: Model Consumption
Now that we have trained and evaluated our model, we can start using it to make predictions.
As seen previously in the Evaluate step, we can make batch predictions with the Transform() method. Alternatively, we can create a Prediction Engine, a convenience API for making predictions on single instances of data. The CreatePredictionEngine() method takes in an input class (ModelInput above) and an output class. The output class defines the data schema for what the model returns when making the prediction, which can vary based on the ML task.
Regression models return a column named Score, which contains the predicted value.
Add the following code to define the class ModelOutput for making predictions and to specify that FareAmount is the default Score column:
public class ModelOutput
{
    [ColumnName("Score")]
    public float FareAmount;
}
Then, we can create input with sample values, create a Prediction Engine based on the trained model and input/output classes, call the Predict() method to make a prediction on the sample input, and print out the predicted result by adding the following as the next lines of code in the Program.cs:
// 7. Predict on sample data and print results
var input = new ModelInput
{
    PassengerCount = 2,
    TripDistance = 4,
    TripTime = 1150,
    PaymentType = "CRD"
};
var result = mlContext.Model.CreatePredictionEngine<ModelInput, ModelOutput>(model).Predict(input);
Console.WriteLine($"Predicted fare: " + $"{result.FareAmount}");
The whole program.cs fils is as following:
using Microsoft.ML;
using Microsoft.ML.Data;
using TaxiFairePrediction;


// step:1. Initialize ML.NET environment
MLContext mlContext = new MLContext();

// step:2. Load training data
IDataView trainData = mlContext.Data.LoadFromTextFile<ModelInput>("taxi-fare-train.csv", separatorChar: ',', hasHeader: true);

// step:3. Add data transformations
var dataProcessPipeline = mlContext.Transforms.Categorical.OneHotEncoding(outputColumnName: "PaymentTypeEncoded", "PaymentType")
.Append(mlContext.Transforms.Concatenate(outputColumnName: "Features", "PaymentTypeEncoded", "PassengerCount", "TripTime", "TripDistance"));

//step: 4. Add algorithm
var trainer = mlContext.Regression.Trainers.LightGbm(labelColumnName: "FareAmount", featureColumnName: "Features");
var trainingPipeline = dataProcessPipeline.Append(trainer);

// 5. Train model
var model = trainingPipeline.Fit(trainData);

// 6. Evaluate model on test data
IDataView testData = mlContext.Data.LoadFromTextFile<ModelInput>("taxi-fare-test.csv", separatorChar: ',', hasHeader: true);
IDataView predictions = model.Transform(testData);
var metrics = mlContext.Regression.Evaluate(predictions, "FareAmount");
Console.WriteLine($"Model Quality" + $"(RSquared):{metrics.RSquared}");


// step 7. Predict on sample data and print results
var input = new ModelInput
{
    PassengerCount = 2,
    TripDistance = 4,
    TripTime = 1150,
    PaymentType = "CRD"
};
var result = mlContext.Model.CreatePredictionEngine<ModelInput, ModelOutput>(model).Predict(input);
Console.WriteLine($"Predicted fare: " + $"{result.FareAmount}");
Test the Model consumption by click on F5 in Visual Studio:

As you see from the above figure, evaluate value is: 0.6861751348834768 and
Predicted fare is: 16.211039
Source code is in my Github
Model Consumption in End-User Applications
Although we can train and consume our model in the same application, it’s more common to separate model training and consumption into two separate apps.
Note: Normally, you’ll train and save your model in a console app and then load and consume your model in the separate end-user application.
To save your trained model to a serialized zip file, use the following code in your training app: program.cs.
Run the application by pressing to F5 in Visual Studio, then you can find the zip file: MLModel in the path:\bin\Release\net7.0.
In your end-user application, add the trained model to your solution, reference the ML.NET NuGet package, define the output data class, feed in your input data and then add the following code to load and consume your model and make predictions on the input data:
using Microsoft.ML;
using TaxiFairePrediction;

MLContext mlContext = new MLContext();
string modelPath = AppDomain.CurrentDomain.BaseDirectory + "MLModel.zip";
var mlModel = mlContext.Model.Load(modelPath, out var modelInputSchema);
var predEngine = mlContext.Model.CreatePredictionEngine<ModelInput, ModelOutput>(mlModel);
var input = new ModelInput
{
    PassengerCount = 2,
    TripDistance = 4,
    TripTime = 1150,
    PaymentType = "CRD"
};
ModelOutput result = predEngine.Predict(input);

Console.WriteLine($"Predicted fare: " + $"{result.FareAmount}");
I have created a new project in the same solution and call it: EandUserModelConsumption, added the above code to the program.cs and added package. Microsoft.ML. I added project reference TaxiFairePrediction to this project.
I have copied the file: MLModel.zip and paste it to the \bin\Release\net7.0 of the new project and run the application.
The result is as follow:
As you see in the above figure the Predicted fare: 16.067862.
You can learn more about model consumption at https://aka.ms/code-mlnet-consume.
Source code is in my Github
Conclusion
In this post we have built app Taxi fare ML.NET model then tested it by evaluation and consumption steps. After that we have created MlModel.zip for “Model Consumption in End-User Applications” then created a new project and tested for Model consumption by using the MlModel.zip file.
My next post explores Classify the severity of restaurant health violations
This post is part of “Machine-learning-Step by step”.
