Getting Started with .NET EF Core
1. Prerequisites
Install the following software:
- .NET Core CLI
- Visual Studio
- .NET Core SDK.
2. Create a new project call it EFGetStarted.
dotnet new console -o EFGetStarted
3. Install Entity Framework Core
To install EF Core, you install the package for the EF Core database provider(s) you want to target. This tutorial uses SQLite because it runs on all platforms that .NET Core supports. For a list of available providers, see Database Providers.
dotnet add package Microsoft.EntityFrameworkCore.Sqlite4. Create the model
Define a context class and entity classes that make up the model. In the project directory, create Model.cs with the following code
using Microsoft.EntityFrameworkCore;
 using System;
using System.Collections.Generic;
public class BloggingContext : DbContext
{
public DbSet<Blog> Blogs { get; set; }
 public DbSet<Post> Posts { get; set; }
public string DbPath { get; }
 public BloggingContext()
 {
var folder = Environment.SpecialFolder.LocalApplicationData;
var path = Environment.GetFolderPath(folder);
 DbPath = System.IO.Path.Join(path, "blogging.db");
}
// The following configures EF to create a Sqlite database file in the
// special "local" folder for your platform.
 protected override void OnConfiguring(DbContextOptionsBuilder options) => options.UseSqlite($"Data Source={DbPath}");
}
public class Blog
{
public int BlogId { get; set; }
 public string Url { get; set; }
 public List<Post> Posts { get; } = new(); }
public class Post
{
public int PostId { get; set; }
public string Title { get; set; }
public string Content { get; set; }
public int BlogId { get; set; }
public Blog Blog { get; set; }
}
EF Core can also reverse engineer a model from an existing database.
Tip: This application keeps things simple for clarity. Connection strings should not be stored in the code for production applications. You may also want to split each C# class into its own file.
5. Create the database
The following steps use migrations to create a database.
Run the following command:
dotnet tool install --global dotnet-ef dotnet add package Microsoft.EntityFrameworkCore.Design dotnet ef migrations add InitialCreate dotnet ef database updatemigrations command scaffolds a migration to create the initial set of tables for the model. The database update !6. Implement a CRUD (create, Read, Update, Delete) program
Open Program.cs and replace the contents with the following code:
using System;
using System.Linq;

using var db = new BloggingContext();

// Note: This sample requires the database to be created before running.
Console.WriteLine($"Database path: {db.DbPath}.");

// Create
Console.WriteLine("Inserting a new blog");
db.Add(new Blog { Url = "http://blogs.msdn.com/adonet" });
db.SaveChanges();

// Read
Console.WriteLine("Querying for a blog");
var blog = db.Blogs
    .OrderBy(b => b.BlogId)
    .First();

// Update
Console.WriteLine("Updating the blog and adding a post");
blog.Url = "https://devblogs.microsoft.com/dotnet";
blog.Posts.Add(
    new Post { Title = "Hello World", Content = "I wrote an app using EF Core!" });
db.SaveChanges();

// Delete
Console.WriteLine("Delete the blog");
db.Remove(blog);
db.SaveChanges();
7. Run the App and Test the project
start command line prompt from the project folder and run the following command:
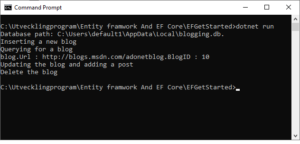
dotnet runOut put of command:

Output shows that a new blog is created with BlogID = 10.
Conclusion
In this post, I have created a .NET Core App, with using NET Core CLI, created a new project, insalled Entity Framework Core, created model, Database and a CRUD program and tested it.
This post was part of Entity Framework Core Step by Step