Dockerfile for Production (Release) and Debug
customizing Docker containers in Visual Studio
You can customize your container images by editing the Dockerfile that Visual Studio generates when you add Docker support to your project. Whether you’re building a customized container from the Visual Studio IDE, or setting up a command-line build, you need to know how Visual Studio uses the Dockerfile to build your projects. You need to know such details because, for performance reasons, Visual Studio follows a special process for building and running containerized apps that isn’t obvious from the Dockerfile.
Suppose you want to make a change in the Dockerfile and see the results in both debugging and in production containers. In that case, you can add commands in the Dockerfile to modify the first stage (usually base). See Modify the container image for debugging and production. But, if you want to make a change only when debugging, but not production, then you should create another stage, and use the DockerfileFastModeStage build setting to tell Visual Studio to use that stage for debug builds. See Modify the container image only for debugging.
This article explains the Visual Studio build process for containerized apps in some detail, then it contains information on how to modify the Dockerfile to affect both debugging and production builds, or just for debugging.
Multistage build
When Visual Studio builds a project that doesn’t use Docker containers, it invokes MSBuild on the local machine and generates the output files in a folder (typically bin) under your local solution folder. For a containerized project, however, the build process takes account of the Dockerfile’s instructions for building the containerized app. The Dockerfile that Visual Studio uses is divided into multiple stages. This process relies on Docker’s multistage build feature.
The multistage build feature helps make the process of building containers more efficient, and makes containers smaller by allowing them to contain only the bits that your app needs at run time. Multistage build is used for .NET Core projects, not .NET Framework projects.
The multistage build allows container images to be created in stages that produce intermediate images. As an example, consider a typical Dockerfile. The first stage is called base in the Dockerfile that Visual Studio generates, although the tools don’t require that name.
FROM mcr.microsoft.com/dotnet/aspnet:3.1-buster-slim AS base
WORKDIR /app
EXPOSE 80
EXPOSE 443
The lines in the Dockerfile begin with the ASP.NET image from Microsoft Container Registry (mcr.microsoft.com) and create an intermediate image base that exposes ports 80 and 443, and sets the working directory to /app.
The next stage is build, which appears as follows:
FROM mcr.microsoft.com/dotnet/sdk:3.1-buster-slim AS build
WORKDIR /src
COPY ["ProductMicroservice/ProductMicroservice.csproj", "ProductMicroservice/"]
 RUN dotnet restore "ProductMicroservice/ProductMicroservice.csproj"
 COPY . .
WORKDIR "/src/ProductMicroservice"
RUN dotnet build "ProductMicroservice.csproj" -c Release -o /app/build
You can see that the build stage starts from a different original image from the registry (sdk rather than aspnet), rather than continuing from base. The sdk image has all the build tools, and for that reason it’s a lot bigger than the aspnet image, which only contains runtime components. The reason for using a separate image becomes clear when you look at the rest of the Dockerfile.
The Next stage is publish
FROM build AS publish
RUN dotnet publish "ProductMicroservice.csproj" -c Release -o /app/publish
FROM base AS final
 WORKDIR /app
 COPY --from=publish /app/publish .
ENTRYPOINT ["dotnet", "WebApplication43.dll"]
The final stage starts again from base, and includes the COPY --from=publish to copy the published output to the final image. This process makes it possible for the final image to be a lot smaller, since it doesn’t need to include all of the build tools that were in the sdk image.
Debugging
When building in Debug configuration, there are several optimizations that Visual Studio does that help with the performance of the build process for containerized projects. The build process for containerized apps is not as straightforward as simply following the steps outlined in the Dockerfile. Building in a container is much slower than building on the local machine. So, when you build in the Debug configuration, Visual Studio actually builds your projects on the local machine, and then shares the output folder to the container using volume mounting. A build with this optimization enabled is called a Fast mode build.
In Fast mode, Visual Studio calls docker build with an argument that tells Docker to build only the base stage (you can change that by setting the MSBuild property, DockerfileFastModeStage, described later). Visual Studio handles the rest of the process without regard to the contents of the Dockerfile. So, when you modify your Dockerfile, such as to customize the container environment or install additional dependencies, you should put your modifications in the first stage. Any custom steps placed in the Dockerfile’s build, publish, or final stages will not be executed.
This performance optimization only occurs when you build in the Debug configuration. In the Release configuration, the build occurs in the container as specified in the Dockerfile.
If you want to disable the performance optimization and build as the Dockerfile specifies, then set the ContainerDevelopmentMode property to Regular in the project file as follows:
<PropertyGroup> <ContainerDevelopmentMode>Regular</ContainerDevelopmentMode> </PropertyGroup>To restore the performance optimization, remove the property from the project file.
When you start debugging (F5), a previously started container is reused, if possible. If you don’t want to reuse the previous container, you can use Rebuild or Clean commands in Visual Studio to force Visual Studio to use a fresh container.
The process of running the debugger depends on the type of project and container operating system:
| Scenario | Debugger process |
|---|---|
| .NET Core apps (Linux containers) | Visual Studio downloads vsdbg and maps it to the container, then it gets called with your program and arguments (that is, dotnet webapp.dll), and then debugger attaches to the process. |
| .NET Core apps (Windows containers) | Visual Studio uses onecoremsvsmon and maps it to the container, runs it as the entry point and then Visual Studio connects to it and attaches to the program. This is similar to how you would normally set up remote debugging on another computer or virtual machine. |
| .NET Framework apps | Visual Studio uses msvsmon and maps it to the container, runs it as part of the entry point where Visual Studio can connect to it, and attaches to the program. |
Modify container image for debugging and production
To modify the container image for both debugging and production, modify the base stage. Add your customizations to the Dockerfile in the base stage section, usually the first section in the Dockerfile. Refer to the Dockerfile reference in the Docker documentation for information about Dockerfile commands.
FROM mcr.microsoft.com/dotnet/aspnet:6.0 AS base
WORKDIR /app
EXPOSE 80
EXPOSE 1433
# <add your commands here>
FROM mcr.microsoft.com/dotnet/sdk:6.0 AS build
WORKDIR /src
COPY ["ProductMicroservice/ProductMicroservice/ProductMicroservice.csproj", "ProductMicroservice/"]
RUN dotnet restore "ProductMicroservice/ProductMicroservice.csproj"
COPY . .
WORKDIR "/src/ProductMicroservice"
RUN dotnet build "ProductMicroservice.csproj" -c Release -o /app/build
FROM build AS publish
RUN dotnet publish "ProductMicroservice.csproj" -c Release -o /app/publish
FROM base AS final
WORKDIR /app
COPY --from=publish /app/publish .
ENTRYPOINT ["dotnet", "ProductMicroservice.dll"]
Running docker-compose with this Dockerfile in visual studio 2022.
1- Running in Debug configuration:
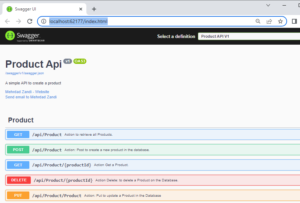
Running with Debug mode, docker-compose as startup project in visual studio, it is going fine, Swagger UI comes up and you can do operations : get, post, add, delete, get data from SQL DB without any problem
2- Running in Release configuration:
Running with Release mode, docker-compose as startup project in visual studio, the process is fine and starting the Swagger UI and it is nice. You can access to the database and GET or Post a product.
Modify container image only for debugging
This scenario applies when you want to do something with your containers to help you in the debugging process, such as installing something for diagnostic purposes, but you don’t want that installed in production builds.
To modify the container only for debugging, create a stage and then use the MSBuild property DockerfileFastModeStage to tell Visual Studio to use your customized stage when debugging. Refer to the Dockerfile reference in the Docker documentation for information about Dockerfile commands.
In the following example, we install the package procps-ng, but only in debug mode. This supplies the command pidof, which Visual Studio requires but isn’t in the Mariner image used here. The stage we use for fast mode debugging is debug, a custom stage defined here. The fast mode stage does not need to inherit from the build or publish stage, it can inherit directly from the base stage, because Visual Studio will mount a volume that contains everything needed to run the app, as described earlier in this article.
#See https://aka.ms/containerfastmode to understand how Visual Studio uses this Dockerfile to build your images for faster debugging.
 FROM mcr.microsoft.com/dotnet/aspnet:6.0-cbl-mariner2.0 AS base
 WORKDIR /app
EXPOSE 80
EXPOSE 443
FROM base as debug
 RUN tdnf install procps-ng -y
FROM mcr.microsoft.com/dotnet/sdk:6.0-cbl-mariner2.0 AS build
WORKDIR /src
COPY ["ProductMicroservice/ProductMicroservice.csproj", "ProductMicroservice/"]
RUN dotnet restore "ProductMicroservice/ProductMicroservice.csproj"
 COPY . .
WORKDIR "/src/ProductMicroservice"
RUN dotnet build "ProductMicroservice.csproj" -c Release -o /app/build
FROM build AS publish
RUN dotnet publish "ProductMicroservice.csproj" -c Release -o /app/publish
FROM base AS final
WORKDIR /app
COPY --from=publish /app/publish .
ENTRYPOINT ["dotnet", "ProductMicroservice.dll"]
If I use the above as Dockerfile and trying to run with Docker-compose on Visual Studio 2022 then the Swagger UI is uploaded as following:

Select the GET and Try Out, then press to the execute, then shows you all the products from the database.
Debugging in Visual studio:
Startup project: docker-compose or ProductMicroservice and visual studio configured for Debug . Starting with Debug, program doesn’t stop on the break point with any code of any classes, why?
Cause
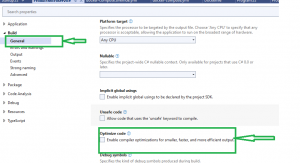
This problem occurs because project ProductMicroservice debugging isn’t enabled on project Properties..
Resolution
To resolve this problem, follow these steps in Visual Studio .NET:
- Right-click your project:ProductMicroservice from the Solution Explorer, and then click Properties.
- Click the General tab.
- Under Optimize Code, uncheck the checkbox as following figure:

After enabling you can debug the project.
Conclusion
In this post we look an overview of Dockerfile in multistages build and running docker-compose as startup project with Debug and production(Release) configuration in visual studio 2022.
You can find the code of the finished demo on GitHub.
Next post I will explain, Microservice with CQRS in ASP.NET Core
This post is part of “Microservices-Step by step”.