Build CI Pipeline for Docker in Azure DevOps
In this post I want to build microservices in an other Azure DevOps CI pipeline and push the images to Docker Hub
Setting up a Service Connection to Docker Hub
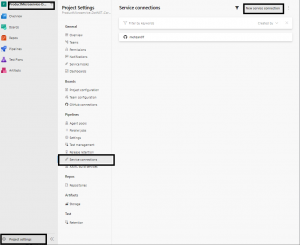
In Azure Devops I select your project (in my case ProductMicroservice-DotNET-Core-Master) to create new CI Pipeline for building the Docker image, and set up a connection to Docker Hub to push the image to its repository. To do that in Azure DevOps, click on Project Settings –> Service connections –> New service connection. as following image:

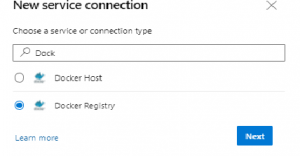
Press to new Service connection and then search Docker in the Search list of Services as following:

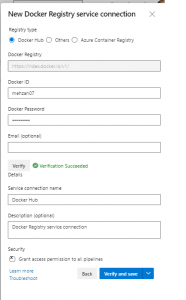
in the new window (see following) select Docker Hub and write your Docker ID and Docker password that you have registered, and then press to Verify then you se Verification Succeeded.

Checkmark the checkbox: Grant access permission to all pipelines and press to Verify and save button then you have the following image:

Creating new Azure DevOps CI Pipeline
To create a new CI Pipeline. Select the source code location and then any template (for me: ProductMicroservice-DotNET-Core-Master). After the yml file is created, delete its content. To see more details on creating a Pipeline, see my post “Microservice-dotnet-core-ci-pipeline-azure-devops”.
you can first create .yml file first in the Github and name it Product-docker-CI.yml and after that create CI-Pipeline.
Now we have an empty file: Product-docker-CI.yml
Configure the Pipeline
Set up some basic configuration for the pipeline, give it a name, set a trigger to run the pipeline every time a commit is made to master and use an Ubuntu agent. Additionally, the build should only be triggered if changes to the ProductMicroservice folder are made. You can do this with the following code:
name : ProductMicroservice-CI
trigger:
  branches:
    include:
      - master
  paths:
    include:
      -  ProductMicroservice/*
pool:
  vmImage: 'windows-latest'
Next step, up the variables for pipeline. I define a name and set the tag to the build id using the built-in variable $(Build.BuildId). This increases the tag of image automatically every time when a build runs.
variables:
  ImageName: 'mehzan07/ProductMicroservice:$(Build.BuildId)'
Build the Docker Image
Now that everything is set up, let’s add a task to build the image. Before you can do that, you have to add a stage and a job. You can use whatever name you want for your stage and job. For now, you only need one. It is good practice to use a meaningful name though.
Inside the job, add a task for Docker. Inside this task add your previously created, service connection (Docker Hub), path to the dockerfile, an image name, and the build context. As the command use Build an Image.
stages:
- stage: Build
  displayName: Build image
  jobs:
  - job: Build
    displayName: Build and push Docker image
    steps:
    - task: Docker@1
      inputs:
        containerregistrytype: 'Container Registry'
        dockerRegistryEndpoint: 'Docker Hub'
        command: 'Build an image'
        dockerFile: '**/Dockerfile'
        imageName: '$(ImageName)'
        useDefaultContext: false
        buildContext: 'ProductMicroservice'
      displayName: 'Build the Docker image'
Pushing Image to Docker Hub
In the last step is pushing image to a registry. I am using Docker Hub because it is publicly available but you can also use a private one like Azure Container Registry (ACR) or even a private Docker Hub repository.
Add the following code to your pipeline:
- task: Docker@1
  inputs:
    containerregistrytype: 'Container Registry'
    dockerRegistryEndpoint: 'Docker Hub'
    command: 'Push an image'
    imageName: '$(ImageName)'
  condition: and(succeeded(), ne(variables['Build.Reason'], 'PullRequest'))
  displayName: 'Push the Docker image to Dockerhub'
I set container registry “Container Registry” dockerRegistryEndpoint: “Docker Hub” which is the previously created service connection. The command indicates that we want to push an image and I have set the image name from the previously created variable (‘$(ImageName)). The condition says that the task only runs when the task was successful and the build is not triggered by a pull request.
The finished Azure DevOps CI Pipeline is as following:
name : ProductMicroservice-CI
trigger:
  branches:
    include:
      - master
  paths:
    include:
      - ProductMicroservice/*
pool:
  vmImage: 'ubuntu-latest'
variables:
  ImageName: 'mehzan07/ProductMicroservice:$(Build.BuildId)'
stages:
- stage: Build
  displayName: Build image
  jobs:
  - job: Build
    displayName: Build and push Docker image
    steps:
    - task: Docker@1
      inputs:
        containerregistrytype: 'Container Registry'
        dockerRegistryEndpoint: 'Docker Hub'
        command: 'Build an image'
        dockerFile: '**/Dockerfile'
        imageName: '$(ImageName)'
        useDefaultContext: false
        buildContext: 'ProductMicroservice'
      displayName: 'Build the Docker image'
    - task: Docker@1
      inputs:
        containerregistrytype: 'Container Registry'
        dockerRegistryEndpoint: 'Docker Hub'
        command: 'Push an image'
        imageName: '$(ImageName)'
      condition: and(succeeded(), ne(variables['Build.Reason'], 'PullRequest'))
      displayName: 'Push the Docker image to Dockerhub'
Testing the Azure DevOps CI Pipeline
with tesng of Pipeline I have got some errors which was depended on the Dockerfile which was generated by Visual studio, One of Error was:
receiving the missing MAIN method error, not having a suitable static main entry point,
I have fixed this by replacing##COPY . . to COPY . ProductMicroservice/ in Dockerfile
I have done some modification in Docker file and the results is shown as following and the original lines are commented. original lines are red and new lines are green.
The code of Dockerfil can be found here
Run the Pipeline by pressing to Save and Run button.
Then we see that build has been succeded as followoing image:
Docker pipeline ran successfully
And if we check the Doker Hub we see that the image has been published in the as following:
 Docker image has been pushed to Docker Hub
the yml file is in ProductMicroservice-DotNET-Core-Master/Pipelines/Product-docker-ci.yml
The code can found on my GitHub.
Conclusion
By this post I have showed that an automated docker CI pipeline to build and push new images is an integral point of every DevOps process. It is easy to automate everything and create a new image every time changes are pushed to the master branch.
In my next post, I will explain how to create a REST API, connect to SQL local DB , create a CI Pipeline in Azure DevOps, deploy the SQL local DB to Azure SQL, create API App in Azure Cloud and deploy Rest API to to Azure API App by using Azure DevOps Pipeline Release (CI/CD process).
This post is part of Azure DevOps step by step.
