Azure Pipelines and DevOps
What is pipelining?
Pipelining is the process of storing and prioritizing computer instructions that the processor executes. The pipeline is a “logical pipeline” that lets the processor perform an instruction in multiple steps. The processing happens in a continuous, orderly, somewhat overlapped manner.
What is a pipeline in programming?
A pipeline is a process that drives software development through a path of building, testing, and deploying code, also known as CI/CD. By automating the process, the objective is to minimize human error and maintain a consistent process for how software is released.
What is a pipeline in DevOps?
A DevOps pipeline is a set of automated processes and tools that allows both developers and operations professionals to work cohesively to build and deploy code to a production environment.
What is Azure Pipelines?
Azure Pipelines automatically builds and tests code projects. It supports all major languages and project types and combines continuous integration (CI), continuous delivery (CD), and continuous testing to build, test, and deliver your code to any destination. You accomplish this by defining a pipeline.
The latest way to build pipelines is with the YAML pipeline editor. You can also use Classic pipelines with the Classic editor.
Following figure illustrate creation of Pipeline in Azure DevOps and we are going to explain how to create yaml Pipeline in Azure DevOps later in this post.

In this post I am going to explain YAML Pipeline which is used in Azure DevOps Pipelines (Azure Pipelines).
Define pipelines using YAML syntax
You define your pipeline in a YAML file called azure-pipelines.yml with the rest of your app.

- The pipeline is versioned with your code. It follows the same branching structure. You get validation of your changes through code reviews in pull requests and branch build policies.
- Every branch you use can modify the pipeline by modifying the
azure-pipelines.ymlfile. Learn more about branch consideration for YAML pipelines. - A change to the build process might cause a break or result in an unexpected outcome. Because the change is in version control with the rest of your codebase, you can more easily identify the issue.
Your code is now updated, built, tested, and packaged. It can be deployed to any target.
Key concepts for Azure Pipelines
Azure DevOps Services
The key concepts, components that make up a pipeline and the basic terms and parts of a pipeline
Key concepts overview in Pipeline:

Azure Pipelines terms
- A trigger tells a Pipeline to run.
- A pipeline is made up of one or more stages. A pipeline can deploy to one or more environments.
- A stage is a way of organizing jobs in a pipeline and each stage can have one or more jobs.
- Each job runs on one agent. A job can also be agentless.
- Each agent runs a job that contains one or more steps.
- A step can be a task or script and is the smallest building block of a pipeline.
- A task is a pre-packaged script that performs an action, such as invoking a REST API or publishing a build artifact.
- An artifact is a collection of files or packages published by a run.
Description of terms in Pipelines
Agent
When your build or deployment runs, the system begins one or more jobs. An agent is computing infrastructure with installed agent software that runs one job at a time. For example, your job could run on a Microsoft-hosted Ubuntu agent.
Approvals
Approvals define a set of validations required before a deployment runs. Manual approval is a common check performed to control deployments to production environments. When checks are configured on an environment, pipelines will stop before starting a stage that deploys to the environment until all the checks are completed successfully.
Artifact
An artifact is a collection of files or packages published by a run. Artifacts are made available to subsequent tasks, such as distribution or deployment. For more information.
Continuous delivery
Continuous delivery (CD) is a process by which code is built, tested, and deployed to one or more test and production stages. Deploying and testing in multiple stages helps drive quality. Continuous integration systems produce deployable artifacts, which include infrastructure and apps. Automated release pipelines consume these artifacts to release new versions and fixes to existing systems. Monitoring and alerting systems run constantly to drive visibility into the entire CD process. This process ensures that errors are caught often and early.
Continuous integration
Continuous integration (CI) is the practice used by development teams to simplify the testing and building of code. CI helps to catch bugs or problems early in the development cycle, which makes them easier and faster to fix. Automated tests and builds are run as part of the CI process. The process can run on a set schedule, whenever code is pushed, or both. Items known as artifacts are produced from CI systems. They’re used by the continuous delivery release pipelines to drive automatic deployments.
Deployment
For Classic pipelines, a deployment is the action of running the tasks for one stage, which can include running automated tests, deploying build artifacts, and any other actions are specified for that stage.
For YAML pipelines, a deployment typically refers to a deployment job. A deployment job is a collection of steps that are run sequentially against an environment. You can use strategies like run once, rolling, and canary for deployment jobs.
Deployment group
A deployment group is a set of deployment target machines that have agents installed. A deployment group is just another grouping of agents, like an agent pool. You can set the deployment targets in a pipeline for a job using a deployment group. Learn more about provisioning agents for deployment groups.
Environment
An environment is a collection of resources, where you deploy your application. It can contain one or more virtual machines, containers, web apps, or any service that’s used to host the application being developed. A pipeline might deploy the app to one or more environments after build is completed and tests are run.
Job
A stage contains one or more jobs. Each job runs on an agent. A job represents an execution boundary of a set of steps. All of the steps run together on the same agent. Jobs are most useful when you want to run a series of steps in different environments. For example, you might want to build two configurations – x86 and x64. In this case, you have one stage and two jobs. One job would be for x86 and the other job would be for x64.
Pipeline
A pipeline defines the continuous integration and deployment process for your app. It’s made up of one or more stages. It can be thought of as a workflow that defines how your test, build, and deployment steps are run.
For Classic pipelines, a pipeline can also be referred to as a definition.
Release
For Classic pipelines, a release is a versioned set of artifacts specified in a pipeline. The release includes a snapshot of all the information required to carry out all the tasks and actions in the release pipeline, such as stages, tasks, policies such as triggers and approvers, and deployment options. You can create a release manually, with a deployment trigger, or with the REST API.
For YAML pipelines, the build and release stages are in one, multi-stage pipeline.
Run
A run represents one execution of a pipeline. It collects the logs associated with running the steps and the results of running tests. During a run, Azure Pipelines will first process the pipeline and then send the run to one or more agents. Each agent will run jobs. Learn more about the pipeline run sequence.
Script
A script runs code as a step in your pipeline using command line, PowerShell, or Bash. You can write cross-platform scripts for macOS, Linux, and Windows. Unlike a task, a script is custom code that is specific to your pipeline.
Stage
A stage is a logical boundary in the pipeline. It can be used to mark separation of concerns (for example, Build, QA, and production). Each stage contains one or more jobs. When you define multiple stages in a pipeline, by default, they run one after the other. You can specify the conditions for when a stage runs. When you are thinking about whether you need a stage, ask yourself:
- Do separate groups manage different parts of this pipeline? For example, you could have a test manager that manages the jobs that relate to testing and a different manager that manages jobs related to production deployment. In this case, it makes sense to have separate stages for testing and production.
- Is there a set of approvals that are connected to a specific job or set of jobs? If so, you can use stages to break your jobs into logical groups that require approvals.
- Are there jobs that need to run a long time? If you have part of your pipeline that will have an extended run time, it makes sense to divide them into their own stage.
Step
A step is the smallest building block of a pipeline. For example, a pipeline might consist of build and test steps. A step can either be a script or a task. A task is simply a pre-created script offered as a convenience to you. To view the available tasks, see the Build and release tasks reference. For information on creating custom tasks, see Create a custom task.
Task
A task is the building block for defining automation in a pipeline. A task is packaged script or procedure that has been abstracted with a set of inputs.
Trigger
A trigger is something that’s set up to tell the pipeline when to run. You can configure a pipeline to run upon a push to a repository, at scheduled times, or upon the completion of another build. All of these actions are known as triggers. For more information, see build triggers and release triggers.
Library
The Library includes secure files and variable groups. Secure files are a way to store files and share them across pipelines. You may need to save a file at the DevOps level and then use it during build or deployment. In that case, you can save the file within Library and use it when you need it. Variable groups store values and secrets that you might want to be passed into a YAML pipeline or make available across multiple pipelines.
Caching
Pipeline caching can help reduce build time by allowing the outputs or downloaded dependencies from one run to be reused in later runs, thereby reducing or avoiding the cost to recreate or redownload the same files again. Caching is especially useful in scenarios where the same dependencies are downloaded over and over at the start of each run. This is often a time consuming process involving hundreds or thousands of network calls.
Caching can be effective at improving build time provided the time to restore and save the cache is less than the time to produce the output again from scratch. Because of this, caching may not be effective in all scenarios and may actually have a negative impact on build time. Caching is currently supported in CI and deployment jobs, but not classic release jobs.
Conditions
You can specify the conditions under which each stage, job, or step runs. By default, a job or stage runs if it doesn’t depend on any other job or stage, or if all of the jobs or stages it depends on have completed and succeeded. This includes not only direct dependencies, but their dependencies as well, computed recursively. By default, a step runs if nothing in its job has failed yet and the step immediately preceding it has finished. You can customize this behavior by forcing a stage, job, or step to run even if a previous dependency fails or by specifying a custom condition.
YAML pipeline editor
Azure Pipelines provides a YAML pipeline editor that you can use to author and edit your pipelines. The YAML editor is based on the Monaco Editor. The editor provides tools like Intellisense support and a task assistant to provide guidance while you edit a pipeline.
Edit a YAML pipeline
To access the YAML pipeline editor, do the following steps.
- Sign in to your organization (
https://dev.azure.com/{yourorganization}). - Select your project, choose Pipelines, and then select the pipeline you want to edit. You can browse pipelines by Recent, All, and Runs.
- Choose Edit.
- Make edits to your pipeline using Intellisense and the task assistant for guidance.
- Choose Save. You can commit directly to your branch, or create a new branch and optionally start a pull request.
Using keyboard shortcuts
The YAML pipeline editor provides several keyboard shortcuts, which we show in the following examples.
- Choose Ctrl+Space for Intellisense support while you’re editing the YAML pipeline.

- Choose F1 (Fn+F1 on Mac) to display the command palette and view the available keyboard shortcuts.

Using task assistant
The task assistant provides a method for adding tasks to your YAML pipeline.
- To display the task assistant, edit your YAML pipeline and choose Show assistant.
-

Show assistant. Press to the Show assistant button then you can see the following:


Note: I have taken another yml Pipeline in the DevOps
Now you can select a task from the list under Tasks or search an especial task
- To hide the task assistant, choose Hide assistant.

- To use the task assistant, browse or search for tasks in the Tasks pane.

- Select the desired task and configure its inputs.
- Choose Add to insert the task YAML into your pipeline.
- You can edit the YAML to make more configuration changes to the task, or you can choose Settings above the task in the YAML pipeline editor to configure the inserted task in the task assistant.
Validate
Validate your changes to catch syntax errors in your pipeline that prevent it from starting. Choose More actions > Validate.

Download full YAML
You can preview the fully parsed YAML document without committing or running the pipeline. Choose More actions > Download full YAML.

Download full YAML Runs the Azure DevOps REST API for Azure Pipelines and initiates a download of the rendered YAML from the editor.
Manage pipeline variables
You can manage pipeline variables both from within your YAML pipeline and from the pipeline settings UI.
YAML pipeline
To manage pipeline variables, do the following steps.
- Edit your YAML pipeline and choose Variables to manage pipeline variables.

2. Choose from the following functions:
-
- New variable: to add your first variable.
- Add
 : to add subsequent variables.
 - Variable name to edit a variable.
- Delete
 : to delete a variable.
-
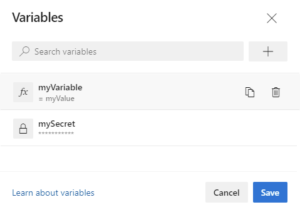
Choose of Variables

Pipeline settings UI
To manage pipelines variables in the UI, do the following steps.
- Edit the pipeline and choose More actions > Triggers. ( more acction is the three … after Run)

When you clicked Triggers, the a list of menu is displayed as follow:

2. Choose Variables in the menu where

View and edit templates
Templates are a commonly used feature in YAML pipelines. They’re an easy way to share pipeline snippets and are a powerful mechanism for verifying and enforcing security and governance in your pipeline. Previously, the editor didn’t support templates, so authors of YAML pipelines couldn’t get intellisense assistance. Now Azure Pipelines supports a YAML editor, for which we’re previewing support. To enable this preview, go to preview features in your Azure DevOps organization, and enable YAML templates editor.
Important: This feature has the following limitations.
- If the template has required parameters that aren’t provided as inputs in the main YAML file, then the validation fails and prompts you to provide those inputs. You can’t create a new template from the editor. You can only use or edit existing templates.
Enabling YAML templates editor
In your DevOps, click on your organization and the in the upper right on User to see User Setting as shown in the following figure:

Click on the User Settings then you can see preview features as the following figure:
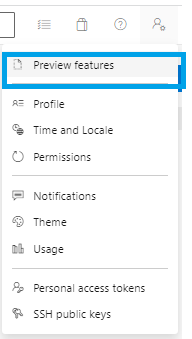
Press to the Preview features and find YAML templates editor feature from the list and enable it as following figure:

Note: For me YAML templates editor is enabled by default and it is not posible to disable it.
As you edit your main Azure Pipelines YAML file, you can either include or extend a template.
Go to a YAML pipeline which is using YAML templates. You would be able to see View template link above the Template as shown in the following image

As you enter the name of your template, you may be prompted to validate your template. Once validated, the YAML editor understands the schema of the template, including the input parameters.
Post validation, you can go into the template by choosing View template, which opens the template in a new browser tab. You can make changes to the template using all the features of the YAML editor.
Define pipelines using the Classic interface
Create and configure pipelines in the Azure DevOps web portal with the Classic user interface editor. You define a build pipeline to build and test your code, and then to publish artifacts. You also define a release pipeline to consume and deploy those artifacts to deployment targets.

Follow these basic steps:
- Configure Azure Pipelines to use your Git repo.
- Use the Azure Pipelines classic editor to create and configure your build and release pipelines.
- Push your code to your version control repository. This action triggers your pipeline and runs tasks such as building or testing code.
The build creates an artifact that’s used by the rest of your pipeline to run tasks such as deploying to staging or production.
Your code is now updated, built, tested, and packaged. It can be deployed to any target.
Feature availability
Certain pipeline features are only available when using YAML or when defining build or release pipelines with the Classic interface. The following table indicates which features are supported and for which tasks and methods.
| Feature | YAML | Classic Build | Classic Release | Notes |
|---|---|---|---|---|
| Agents | Yes | Yes | Yes | Specifies a required resource on which the pipeline runs. |
| Approvals | Yes | No | Yes | Defines a set of validations required prior to completing a deployment stage. |
| Artifacts | Yes | Yes | Yes | Supports publishing or consuming different package types. |
| Caching | Yes | Yes | No | Reduces build time by allowing outputs or downloaded dependencies from one run to be reused in later runs. In Preview, available with Azure Pipelines only. |
| Conditions | Yes | Yes | Yes | Specifies conditions to be met prior to running a job. |
| Container jobs | Yes | No | No | Specifies jobs to run in a container. |
| Demands | Yes | Yes | Yes | Ensures pipeline requirements are met before running a pipeline stage. Requires self-hosted agents. |
| Dependencies | Yes | Yes | Yes | Specifies a requirement that must be met in order to run the next job or stage. |
| Deployment groups | Yes | No | Yes | Defines a logical set of deployment target machines. |
| Deployment group jobs | No | No | Yes | Specifies a job to release to a deployment group. |
| Deployment jobs | Yes | No | No | Defines the deployment steps. |
| Environment | Yes | No | No | Represents a collection of resources targeted for deployment. Available with Azure Pipelines only. |
| Gates | No | No | Yes | Supports automatic collection and evaluation of external health signals prior to completing a release stage. Available with Classic Release only. |
| Jobs | Yes | Yes | Yes | Defines the execution sequence of a set of steps. |
| Service connections | Yes | Yes | Yes | Enables a connection to a remote service that is required to execute tasks in a job. |
| Service containers | Yes | No | No | Enables you to manage the lifecycle of a containerized service. |
| Stages | Yes | No | Yes | Organizes jobs within a pipeline. |
| Task groups | No | Yes | Yes | Encapsulates a sequence of tasks into a single reusable task. If using YAML, see templates. |
| Tasks | Yes | Yes | Yes | Defines the building blocks that make up a pipeline. |
| Templates | Yes | No | No | Defines reusable content, logic, and parameters. |
| Triggers | Yes | Yes | Yes | Defines the event that causes a pipeline to run. |
| Variables | Yes | Yes | Yes | Represents a value to be replaced by data to pass to the pipeline. |
| Variable groups | Yes | Yes | Yes | Use to store values that you want to control and make available across multiple pipelines. |
Customize CI triggers
Pipeline triggers cause a pipeline to run. You can use trigger: to cause a pipeline to run whenever you push an update to a branch (e.g. from Visual Studio or Github). YAML pipelines are configured by default with a CI trigger on your default branch (which is usually main (Master)). You can set up triggers for specific branches or for pull request validation. For a pull request validation trigger, just replace the trigger: step with pr: as shown in the two examples below. By default, the pipeline runs for each pull request change.
- If you’d like to set up triggers, add either of the following snippets at the beginning of your
azure-pipelines.ymlfile.
trigger:
  - main
  - releases/*
pr:
- main
- releases/*main) or a prefix-matching wildcard (for example, releases/*).Pipeline settings
There are some pipeline settings that you don’t manage in your YAML file, such as the YAML file path and enabled status of your pipeline. To configure these settings, navigate to the pipeline details page and choose More actions, Settings. For more information on navigating and browsing your pipelines, see Navigating pipelines.
To accesst to the Pipeline settings, select the pipeline and go to the uper right after Run to click on the three … (More actions) and then press to Settings.

From the Pipeline settings pane you can configure the following settings.
- Processing of new run requests – Sometimes you’ll want to prevent new runs from starting on your pipeline.
- By default, the processing of new run requests is Enabled. This setting allows standard processing of all trigger types, including manual runs.
- Paused pipelines allow run requests to be processed, but those requests are queued without actually starting. When new request processing is enabled, run processing resumes starting with the first request in the queue.
- Disabled pipelines prevent users from starting new runs. All triggers are also disabled while this setting is applied.
- YAML file path – If you ever need to direct your pipeline to use a different YAML file, you can specify the path to that file. This setting can also be useful if you need to move/rename your YAML file.
- Automatically link work items included in this run – The changes associated with a given pipeline run may have work items associated with them. Select this option to link those work items to the run. When Automatically link work items included in this run is selected, you must specify either a specific branch, or
*for all branches, which is the default. If you specify a branch, work items are only associated with runs of that branch. If you specify*, work items are associated for all runs.

Create work item on failure
YAML pipelines don’t have a Create work item on failure setting like classic build pipelines. Classic build pipelines are single stage, and Create work item on failure applies to the whole pipeline. YAML pipelines can be multi-stage, and a pipeline level setting may not be appropriate. To implement Create work item on failure in a YAML pipeline, you can use methods such as the Work Items – Create REST API call or the Azure DevOps CLI az boards work-item create command at the desired point in your pipeline.
The following example has two jobs. The first job represents the work of the pipeline, but if it fails, the second job runs, and creates a bug in the same project as the pipeline.
# When manually running the pipeline, you can select whether it
# succeeds or fails.
parameters:
- name: succeed
  displayName: Succeed or fail
  type: boolean
  default: false

trigger:
- main

pool:
  vmImage: ubuntu-latest

jobs:
- job: Work
  steps:
  - script: echo Hello, world!
    displayName: 'Run a one-line script'

  # This malformed command causes the job to fail
  # Only run this command if the succeed variable is set to false
  - script: git clone malformed input
    condition: eq(${{ parameters.succeed }}, false)

# This job creates a work item, and only runs if the previous job failed
- job: ErrorHandler
  dependsOn: Work
  condition: failed()
  steps:
  - bash: |
      az boards work-item create \
        --title "Build $(build.buildNumber) failed" \
        --type bug \
        --org $(System.TeamFoundationCollectionUri) \
        --project $(System.TeamProject)
    env:
      AZURE_DEVOPS_EXT_PAT: $(System.AccessToken)
    displayName: 'Create work item on failure'
Note: Azure Boards allows you to configure your work item tracking using several different processes, such as Agile or Basic. Each process has different work item types, and not every work item type is available in each process. For a list of work item types supported by each process, see Work item types (WITs).
The previous example uses Runtime parameters to configure whether the pipeline succeeds or fails. When manually running the pipeline, you can set the value of the succeed parameter. The second script step in the first job of the pipeline evaluates the succeed parameter and only runs when succeed is set to false.
The second job in the pipeline has a dependency on the first job and only runs if the first job fails. The second job uses the Azure DevOps CLI az boards work-item create command to create a bug. For more information on running Azure DevOps CLI commands from a pipeline, see Run commands in a YAML pipeline.
This example uses two jobs, but this same approach could be used across multiple stages.
Note: You can also use a marketplace extension like Create Bug on Release failure which has support for YAML multi-stage pipelines.
Predefined variables in Azure Pipelines
There are a number of predefined variables in Azure Pipelines and some of them are as followings:
| predefined variables | Description |
| task: DotNetCoreCLI@2 | Build, test, package, or publish a dotnet application, or run a custom dotnet command. |
| $(Build.ArtifactStagingDirectory) | The local path on the agent where any artifacts are copied to before being pushed to their destination. For example: c:\agent_work\1\a. |
| $(System.DefaultWorkingDirectory) | Default working directory is a pre-defined variable that is mostly used to store the source code of the application. |
To find all predefined variables look to predefined variables
Create your first pipeline
You have learn Pipeline and now you can create your first Pipeline.
I am going to create an Azure Pipeline in Azure DevOps and describe step by step.
Source code can be found on my GitHub.
Prerequisites – Azure DevOps
Make sure you have the following items:
- A GitHub account where you can create a repository. Create one for free.
- An Azure DevOps organization. Create one for free. If your team already has one, then make sure you’re an administrator of the Azure DevOps project that you want to use.
- An ability to run pipelines on Microsoft-hosted agents. You can either purchase a parallel job or you can request a free tier.
Create your first dotnetcore pipeline:
- Sign-in to your Azure DevOps organization and go to your project.
- Go to Pipelines, and then select New pipeline.
- Do the steps of the wizard by first selecting GitHub as the location of your source code.
- You might be redirected to GitHub to sign in. If so, enter your GitHub credentials.
- When you see the list of repositories, select your repository.
- Asks your Configure Pipeline: Select: ASP.NET Core (.NET Framework)
- You might be redirected to GitHub to install the Azure Pipelines app. If so, select Approve & install..
- When your new pipeline appears, take a look at the YAML to see what it does. When you’re ready, select Save and run.
- You’re prompted to commit a new
azure-pipelines.ymlfile to your repository. After you’re happy with the message, select Save and run again.If you want to watch your pipeline in action, select the build job. You just created and ran a pipeline that is automatically created for you, .You now have a working YAML pipeline (azure-pipelines.yml) in your repository that’s ready for you to customize! - 10. When you’re ready to make changes to your pipeline, select it in the Pipelines page, and then Edit the
azure-pipelines.ymlfile.
Location of Pipeline file
A pipeline is defined using a YAML file in your repo. Usually, this file is named azure-pipelines.yml and is located at the root of your repo.
Navigate to the Pipelines page in Azure Pipelines, select the pipeline you created, and choose Edit in the context menu of the pipeline to open the YAML editor for the pipeline.
Examine the contents of the YAML file.
# ASP.NET Core (.NET Framework)
# Build and test ASP.NET Core projects targeting the full .NET Framework.
# Add steps that publish symbols, save build artifacts, and more:
# https://docs.microsoft.com/azure/devops/pipelines/languages/dotnet-core

trigger:
- master

pool:
  vmImage: 'windows-latest'

variables:
  solution: '**/*.sln'
  buildPlatform: 'Any CPU'
  buildConfiguration: 'Release'

steps:
- task: NuGetToolInstaller@1

- task: NuGetCommand@2
  inputs:
    restoreSolution: '$(solution)'

- task: VSBuild@1
  inputs:
    solution: '$(solution)'
    msbuildArgs: '/p:DeployOnBuild=true /p:WebPublishMethod=Package /p:PackageAsSingleFile=true /p:SkipInvalidConfigurations=true /p:DesktopBuildPackageLocation="$(build.artifactStagingDirectory)\WebApp.zip" /p:DeployIisAppPath="Default Web Site"'
    platform: '$(buildPlatform)'
    configuration: '$(buildConfiguration)'

- task: VSTest@2
  inputs:
    platform: '$(buildPlatform)'
    configuration: '$(buildConfiguration)'
Save and run the Pipe line then Running Faild with error:
D:\a\1\s\ProductMicroservice\ProductMicroservice.sln.metaproj(0,0): Error MSB3202: The project file "D:\a\1\s\ProductApi.Service\ProductApi.Service.csproj" was not found.name : NetCore-ProductMicroservice-CI
trigger:
branches:
include:
- master
paths:
    include:
      - ProductMicroservice-DotNET-Core-Master/*
pool:
vmImage: 'windows-latest'
variables:
buildConfiguration: 'Release'
steps:
- task: DotNetCoreCLI@2
  inputs:
    command: 'restore'
    projects: '**/ProductMicroservice*.csproj'
  displayName: 'Restore Nuget Packages'
- task: DotNetCoreCLI@2
inputs:
command: 'build'
projects: '**/ProductMicroservice*.csproj'
arguments: '--no-restore'
displayName: 'Build projects'
- task: DotNetCoreCLI@2
  inputs:
    command: 'test'
    projects: '**/*Test.csproj'
    arguments: '--no-restore --no-build'
  displayName: 'Run Tests'
- task: DotNetCoreCLI@2
inputs:
command: 'publish'
publishWebProjects: false
projects: '**/ProductMicroservice.csproj'
arguments: '--configuration $(buildConfiguration) --no-restore'
modifyOutputPath: false
displayName: 'Publish ProductMicroservice'paths:
include:
- ProductMicroservice-DotNET-Core-Master/*task: DotNetCoreCLI@2as following:steps:
- task: DotNetCoreCLI@2
inputs:
command: 'restore'
projects: '**/ProductMicroservice*.csproj'
displayName: 'Restore Nuget Packages'command: 'restore' uses NuGet to restore dependencies as well as project-specific tools that are specified in the project filetask: DotNetCoreCLI@2)task: DotNetCoreCLI@2
inputs:
command: 'build'
projects: '**/ProductMicroservice*.csproj'
arguments: '--no-restore'
displayName: 'Build projects''--no-restore')task: DotNetCoreCLI@2- task: DotNetCoreCLI@2
inputs:
command: 'test'
projects: '**/*Test.csproj'
arguments: '--no-restore --no-build'
displayName: 'Run Tests'task: DotNetCoreCLI@2)task: DotNetCoreCLI@2
inputs:
command: 'publish'
publishWebProjects: false
projects: '**/ProductMicroservice.csproj'
arguments: '--configuration $(buildConfiguration) --no-restore'
modifyOutputPath: false
displayName: 'Publish ProductMicroservice'ProductMicroservice


Change the platform to build on
You can build your project on Microsoft-hosted agents that already include SDKs and tools for various development languages. Or, you can use self-hosted agents with specific tools that you need.
- Navigate to the editor for your pipeline by selecting Edit pipeline action on the build, or by selecting Edit from the pipeline’s main page.
- Currently the pipeline runs on a Windows agent: vmImage: ‘windows-latest’
pool:
vmImage: "windows-latest"pool:
vmImage: "ubuntu-latest"name : NetCore-ProductMicroservice-CI
trigger:
branches:
include:
- master
paths:
include:
- ProductMicroservice-DotNET-Core-Master/*
pool:
  vmImage: "ubuntu-latest"
variables:
buildConfiguration: 'Release'
steps:
- task: DotNetCoreCLI@2
inputs:
command: 'restore'
projects: '**/ProductMicroservice*.csproj'
displayName: 'Restore Nuget Packages'
- task: DotNetCoreCLI@2
inputs:
command: 'build'
projects: '**/ProductMicroservice*.csproj'
arguments: '--no-restore'
displayName: 'Build projects'
- task: DotNetCoreCLI@2
inputs:
command: 'test'
projects: '**/*Test.csproj'
arguments: '--no-restore --no-build'
displayName: 'Run Tests'
- task: DotNetCoreCLI@2
inputs:
command: 'publish'
publishWebProjects: false
projects: '**/ProductMicroservice.csproj'
arguments: '--configuration $(buildConfiguration) --no-restore'
modifyOutputPath: false
Build across multiple platforms
You can build and test your project on multiple platforms. One way to do it is with strategy and matrix. You can use variables to conveniently put data into various parts of a pipeline. For this example, we’ll use a variable to pass in the name of the image we want to use.
In your azure-pipelines-ci.yml file, replace this content:
pool:
  vmImage: "ubuntu-latest"
with the following content:
strategy:
  matrix:
    linux:
      imageName: "ubuntu-latest"
    mac:
      imageName: "macOS-latest"
    windows:
      imageName: "windows-latest"
  maxParallel: 3

pool:
vmImage: $(imageNamename : NetCore-ProductMicroservice-CI
trigger:
branches:
include:
- master
paths:
include:
- ProductMicroservice-DotNET-Core-Master/*
strategy:
matrix:
linux:
imageName: "ubuntu-latest"
mac:
imageName: "macOS-latest"
windows:
imageName: "windows-latest"
maxParallel: 3
pool:
vmImage: $(imageName)
variables:
buildConfiguration: 'Release'
steps:
- task: DotNetCoreCLI@2
inputs:
command: 'restore'
projects: '**/ProductMicroservice*.csproj'
displayName: 'Restore Nuget Packages'
- task: DotNetCoreCLI@2
inputs:
command: 'build'
projects: '**/ProductMicroservice*.csproj'
arguments: '--no-restore'
displayName: 'Build projects'
- task: DotNetCoreCLI@2
inputs:
command: 'test'
projects: '**/*Test.csproj'
arguments: '--no-restore --no-build'
displayName: 'Run Tests'
- task: DotNetCoreCLI@2
inputs:
command: 'publish'
publishWebProjects: false
projects: '**/ProductMicroservice.csproj'
arguments: '--configuration $(buildConfiguration) --no-restore'
modifyOutputPath: false
displayName: 'Publish ProductMicroservice'- Select Save and then confirm the changes to see your build run up to three jobs on three different platforms.
Each agent can run only one job at a time. To run multiple jobs in parallel you must configure multiple agents. You also need sufficient parallel jobs.
imageName: "windows-latest") And After that it begins with Mac (imageName: "macOS-latest") and at least runs the Linux (imageName: "ubuntu-latest") and you see in running the pipeline all three Platform suceeded:
name : NetCore-ProductMicroservice-CI
trigger:
  branches:
    include:
      - master
  paths:
    include:
      - ProductMicroservice-DotNET-Core-Master/*

pool:
  vmImage: 'ubuntu-latest'

variables:
  buildConfiguration: 'Release'

steps:
- task: DotNetCoreCLI@2
  inputs:
    command: 'restore'
    projects: '**/ProductMicroservice*.csproj'
  displayName: 'Restore Nuget Packages'

- task: DotNetCoreCLI@2
  inputs:
    command: 'build'
    projects: '**/ProductMicroservice*.csproj'
    arguments: '--no-restore'
  displayName: 'Build projects'

- task: DotNetCoreCLI@2
  inputs:
    command: 'test'
    projects: '**/*Test.csproj'
    arguments: '--no-restore --no-build'
  displayName: 'Run Tests'

- task: DotNetCoreCLI@2
  inputs:
    command: 'publish'
    publishWebProjects: false
    projects: '**/ProductMicroservice.csproj'
    arguments: '--configuration $(buildConfiguration) --no-restore'
    modifyOutputPath: false
  displayName: 'Publish ProductMicroservice'
condition: and(succeeded(), ne(variables['Build.Reason'],'PullRequest'))condition I want to run the publish only when the previous steps succeeded and when the build was not triggered by a pull request.Artifacts in Azure Pipelines
Azure Artifacts enables teams to use feeds and upstream sources to manage their dependencies. You can use Azure Pipelines to publish and download different types of artifacts as part of your CI/CD workflow.
Publish Artifacts
Artifacts can be published at any stage of your pipeline. You can use YAML or the classic Azure DevOps editor to publish your packages.
To Publish Artifacts add tasktask: (task: PublishBuildArtifacts@1) as following :
- task: PublishBuildArtifacts@1
  inputs:
    pathToPublish: '$(Build.ArtifactStagingDirectory)'
    artifactName: ProdMicroserviceArtfact
displayName: 'PublishBuildArtifacts for ProductMicroservice'- pathToPublish: the path of your artifact. This can be an absolute or a relative path. Wildcards are not supported.
- artifactName: the name of your artifact.
- PublishBuildArtifacts@1: Use this task in a build pipeline to publish build artifacts to Azure Pipelines, TFS, or a file share.
- $(Build.ArtifaactsStagingDirectory): The local path on the agent where any artifacts are copied to before being pushed to their destination. For example: c:\agent_work\1\a.
Download artifacts
To Download the Artifact add the task: (task: DownloadBuildArtifacts@0) as following:
- task: DownloadBuildArtifacts@0
  inputs:
    buildType: 'current'
    downloadType: 'single'
    artifactName: 'ProdMicroserviceArtfact'
    downloadPath: '$(System.ArtifactDirectory)'
  displayName: 'DownloadBuildArtifacts for ProductMicroservice'
- buildType: specify which build artifacts will be downloaded:
current(the default value) or from a specific build. - downloadType: choose whether to download a single artifact or all artifacts of a specific build.
- artifactName: the name of the artifact that will be downloaded.
- downloadPath: path on the agent machine where the artifacts will be downloaded.
- DowloadBuildArtifacts@0 : Use this task to download files that were saved as artifacts of a completed build.
- $(System.ArtifactDirectory) : The directory to which artifacts are downloaded during deployment of a release. The directory is cleared before every deployment if it requires artifacts to be downloaded to the agent.
name : NetCore-ProductMicroservice-CI
trigger:
  branches:
    include:
      - master
  paths:
    include:
      - ProductMicroservice-DotNET-Core-Master/*

pool:
  vmImage: 'ubuntu-latest'

variables:
  buildConfiguration: 'Release'

steps:
- task: DotNetCoreCLI@2
  inputs:
    command: 'restore'
    projects: '**/ProductMicroservice*.csproj'
  displayName: 'Restore Nuget Packages'

- task: DotNetCoreCLI@2
  inputs:
    command: 'build'
    projects: '**/ProductMicroservice*.csproj'
    arguments: '--no-restore'
  displayName: 'Build projects'

- task: DotNetCoreCLI@2
  inputs:
    command: 'test'
    projects: '**/*Test.csproj'
    arguments: '--no-restore --no-build'
  displayName: 'Run Tests'

- task: DotNetCoreCLI@2
  inputs:
    command: 'publish'
    publishWebProjects: false
    projects: '**/ProductMicroservice.csproj'
    arguments: '--configuration $(buildConfiguration) --output $(Build.ArtifactStagingDirectory)'
    zipAfterPublish: True
    modifyOutputPath: false
  displayName: 'Publish ProductMicroservice'
  condition: and(succeeded(), ne(variables['Build.Reason'],'PullRequest'))


- task: PublishBuildArtifacts@1
  inputs:
    pathToPublish: '$(Build.ArtifactStagingDirectory)'
    artifactName: ProdMicroserviceArtfact
  displayName: 'PublishBuildArtifacts for ProductMicroservice'

- task: DownloadBuildArtifacts@0
  inputs:
    buildType: 'current'
    downloadType: 'single'
    artifactName: 'ProdMicroserviceArtfact'
    downloadPath: '$(System.ArtifactDirectory)'
  displayName: 'DownloadBuildArtifacts for ProductMicroservice'
Save and run this Pipeline then you can see, it is succeed, press to the job then you see the following UI of Pipeline:

Select on the One artifact is produced then you see the following UI:

Select ProductMicroserviceArtifact in the figure above then you see the following UI:

press to the a.zip in the figure above then artifact is downloaded you can see a zip file a.zip.
Unzipt this file you can see all the dotnet library, files, dlls for the ProductMicroservice.
Start command line prompt and navigate to the a folder and run the following command:
>dotnet ProductMicroservice.dllAs following command line:

Start browser with http://localhost:5000, then you see that the Swagger UI is loaded as bellow:

Conclusion
In this Post I have explained about Pipelines in common and YAML, Azure Pipelines and how to use Azure Pipelines in Azure DevOps, how to create a Pipeline, how to modify, how to build and publish a Pipeline, And in the end how to configure the DevOps Pipeline.
Source code can be found on my GitHhub.
In my next post I will explain Build Microservice .NET Core in a CI Pipeline in Azure DevOps
This post is part of Azure DevOps step by step.