Azure DevOps Project Release and Deploy
In this post I am going to explore how to release and deploy the project in Azure DevOps board project after all work items has been moved to Done status and tested.
There are two possibility to release project:
- Release locally on Visual Studio and deploy manually to the production environment.
- Release in Azure DevOps by creating Azure pipeline, release and deploy automatically to the production environment.
Release locally on Visual Studio and deploy manually
DevOps projects Usually are developing in Visual Studio, when a Work Item is assign to a developer, then developer, works on Item in Visual Studio and then checks in the assigned Item and moves item to the done in DevOps.
By locally release means here that you can build and release the project and takes the Release library to the production environment. Release shall be done by giving a Release name and label for for release to separate different releases. This is a possibility for a small company do that without so much work to done.
Release in Azure DevOps by creating Azure pipeline and deploying automatically
Check Continuous Integration
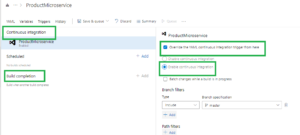
- Click on pipeline, then click on 3 dots and click edit then opens the Pipline and shows Variables and Run in the upper right
- Click on 3 dots at top and click Trigger and then check the checkbox: Override the YAML continuous integration trigger from here
Enable continuous integration3. press to Save under “Save and Quit)
- then shows Continuous Integration is enabled so this means whenever we do a commit to git repository it will automatically trigger a build shown as following figure:

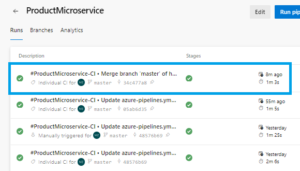
Do a comment to test CI (Continuous Integration) in Visual Studio for a file (e.g. IProductRepository .cs) commit this to Git and then push it to DevOps repository, back to the Azure DevOps and click on Pipelines: shows the ProductMicroservice begins to build the pipeline, by showing just running in the right side of Pipe line, when it finished press to the ProductMicroservice just has been done, in the menu then shows the newly run Pipeline as shown in the following figure:

Run Tasks only when the Master Branch triggered the build and succeeded
As we created we modified the YAML file the publish task runs always, even if we don’t want to create a release.
I want the pipeline to be more efficient to run this task only when the build was triggered by the master branch. To do that, we should add a custom condition to the publish task. I want to run the publish only when the previous steps succeeded and when the build was not triggered by a pull request. we do this with the following code:
task: DotNetCoreCLI@2
  inputs:
    command: 'publish'
    publishWebProjects: false
    projects: '**/ProductMicroservice.csproj'
    arguments: '--configuration $(buildConfiguration) --no-restore'     modifyOutputPath: false
  displayName: 'Publish ProductMicroservice`
  condition: and(succeeded(), ne(variables['Build.Reason'],'PullRequest'))
and the final YAML file is as following:
# ASP.NET Core (.NET Framework)
# Build and test ASP.NET Core projects targeting the full .NET Framework.
# Add steps that publish symbols, save build artifacts, and more:
# https://docs.microsoft.com/azure/devops/pipelines/languages/dotnet-core
name: ProductMicroservice-CI

trigger:
  branches:
   include:
   - master


pool:
  vmImage: 'windows-latest'

variables:
  solution: '**/*.sln'
  buildPlatform: 'Any CPU'
  buildConfiguration: 'Release'

steps:
- task: DotNetCoreCLI@2

#Restore

  inputs:
   command: 'restore'
   projects: '**/ProductMicroservice*.csproj'
  displayName: 'Restore Nuget Packages'
- task: DotNetCoreCLI@2
#build
  inputs:
   command: 'build'
   projects: '**/ProductMicroservice*.csproj'
   arguments: '--no-restore'
  displayName: 'Build projects'
- task: DotNetCoreCLI@2

  # Publish
  inputs:
    command: 'publish'
    publishWebProjects: false
    projects: '**/ProductMicroservice.csproj'
    arguments: '--configuration $(buildConfiguration) --no-restore'
    modifyOutputPath: false
  displayName: 'Publish ProductMicroservice'
condition: and(succeeded(), ne(variables['Build.Reason'],'PullRequest'))The final Pipeline yaml file is as follow:
# ASP.NET Core (.NET Framework)
# Build and test ASP.NET Core projects targeting the full .NET Framework.
# Add steps that publish symbols, save build artifacts, and more:
# https://docs.microsoft.com/azure/devops/pipelines/languages/dotnet-core
name: ProductMicroservice-CI
trigger:
branches:
include:
- master
pool:
vmImage: 'windows-latest'
variables:
solution: '**/*.sln'
buildPlatform: 'Any CPU'
buildConfiguration: 'Release'
steps:
- task: DotNetCoreCLI@2
inputs:
command: 'restore'
projects: '**/ProductMicroservice*.csproj'
displayName: 'Restore Nuget Packages'
- task: DotNetCoreCLI@2
inputs:
command: 'build'
projects: '**/ProductMicroservice*.csproj'
arguments: '--no-restore'
displayName: 'Build projects'
- task: DotNetCoreCLI@2
inputs:
    command: 'publish'
    publishWebProjects: false
    projects: '**/ProductMicroservice.csproj'
    arguments: '--configuration $(buildConfiguration) --output $(Build.ArtifactStagingDirectory)'
    zipAfterPublish: True
    modifyOutputPath: false
  displayName: 'Publish ProductMicroservice'
  condition: and(succeeded(), ne(variables['Build.Reason'],'PullRequest'))
- task: PublishBuildArtifacts@1
inputs:
pathToPublish: '$(Build.ArtifactStagingDirectory)'
artifactName: ProductMicroserviceArtfact
displayName: 'PublishBuildArtifacts for ProductMicroservice'
- task: DownloadBuildArtifacts@0
inputs:
buildType: 'current'
downloadType: 'single'
artifactName: 'ProductMicroserviceArtfact'
downloadPath: '$(System.ArtifactDirectory)'
displayName: 'DownloadBuildArtifacts for ProductMicroservice'
After running of pipeline we see “1 artifact producude”, press to this you can find a file with name: environment-variables.text which contains all environment definitions but there is no binary code to download and run it.
Now press to the 1 artifact link then shows ProductMicroserviceArtifact and under this you see a.zip file, press to this to download it
Unzip this file then you have the release of ProductMicroservice, take this somewhere in the C drive (e.g C:/tmp/a)
Then run command Prompt with following command:
dotnet ProductMicroservice.dll as seen in the following figure:
Start browser with URL: http://localhost:5000, then shows page as following:
This was the process of CI Pipeline in Azure DevOps and how to run Pipleline and create an Artifact file as a release.


