OpenAi as API for your application
In this article we describe how to use OPENAI as API to develop your application.
We are going to create a simple question‐answering web app built using Python’s Flask and OpenAI’s API.
What is OpenAI
OpenAI is an artificial intelligence research and deployment company. Founded in 2015, its mission is to ensure that artificial general intelligence (AGI) benefits all of humanity. The organization develops advanced AI models, including natural language processing, reinforcement learning, and generative AI.
Some of its most well-known projects include:
ChatGPT: A conversational AI model based on the GPT (Generative Pre-trained Transformer) architecture, capable of generating human-like text.
DALL·E: A model that creates images from text prompts.
Codex: An AI that assists with coding by translating natural language into code.
What is ChatGPT?
ChatGPT is a product built on OpenAI’s GPT (Generative Pre-trained Transformer) family of models. It is primarily a single model at any given time, but that model is developed by training multiple iterations and variations, which are sometimes combined or fine-tuned to create the final deployed version.
Breakdown:
-
Single Model at a Time:
- ChatGPT typically runs on one main model (like GPT-3.5 or GPT-4) when you interact with it. These models are designed to handle general-purpose tasks.
-
Pre-training and Fine-tuning:
- The underlying model is trained in multiple stages. Initially, a general language model is pre-trained on vast amounts of internet text.
- Later, the model goes through fine-tuning using techniques like Reinforcement Learning from Human Feedback (RLHF) to improve conversational behavior and alignment with user expectations.
-
Model Variants:
- There may be variations or specialized sub-models in certain applications, such as enhanced code-writing capabilities or domain-specific tasks (e.g., coding, legal, or medical applications).
- In some advanced configurations, multiple models may interact behind the scenes (e.g., chaining or blending different specialized models).
What is OpenAI key and how to found it in windows
An OpenAI API key is a unique string that provides access to OpenAIs models, such as GPT-3, DALL·E, Codex, and others. You need this key to interact with OpenAIs services, typically via API calls.
Steps to Obtain Your OpenAI API Key:
1. Create an OpenAI Account:
Go to the OpenAI website.
Sign up for an account, or log in if you already have one.
2. Access the API Keys:
After logging in, go to your account settings or the API section.
You’ll find an option to generate a new API key. Click Create new secret key.
3. Copy the Key:
Once generated, you can copy the API key to use it in your application.
Storing and Using the API Key on Windows:
1. Environment Variables:
You can store the key as an environment variable to keep it secure.
Open the Start menu, search for Environment Variables, and click on Edit the system environment variables.
In the System Properties window, click Environment Variables.
Under User variables (for your user account), click New and add the following:
Variable name: OPENAI_API_KEY
Variable value: (Paste your API key here)
2. Using the Key in Code:
After setting the environment variable, you can access it in your code by referencing OPENAI_API_KEY.
In Python, for example in your Code:
api_key = os.getenv(“OPENAI_API_KEY”)
Important Notes:
Security: Keep your API key secret. Never expose it publicly, as someone could misuse it.
Limits: OpenAI API might have usage limits, so you should monitor your usage via your OpenAI dashboard.
That is it! Now you can use your OpenAI key to access their models through API calls in your Windows environment.
OpenAI also collaborates with businesses and integrates its models into various tools and platforms to make its technology accessible to developers and the public.
Below is an example of a simple question‐answering web app built using Python’s Flask and OpenAI’s API. This app presents a form for the user to type in a question, sends it to the ChatGPT (via the OpenAI API), and then displays the generated answer.
Before running the app, make sure you:
• Install python, and the required packages (Flask and openai).
• Set your OpenAI API key in an environment variable named OPENAI_API_KEY.
Create a file: app.py and paste the following code to it and save it in your folder.
import openai
import os
from flask import Flask, request, render_template

# Set your OpenAI API key from the environment
openai.api_key = os.environ.get("OPENAI_API_KEY")

# Initialize the OpenAI client
client = OpenAI(api_key=openai.api_key)

app = Flask(__name__) # Create Flask app instance

@app.route("/", methods=["GET", "POST"])
def index():
    answer = None
    if request.method == "POST":
        question = request.form.get("question")
        if question:
            # Create a prompt for the API in the new format
            messages = [
                 {"role": "user", "content": question}
            ]
            try:
                # Call OpenAI API to generate an answer using ChatCompletion
                response = client.chat.completions.create(
                    model="gpt-3.5-turbo",  # Or another available model
                    messages=messages,
                    max_tokens=150,
                    temperature=0.7
                )
                answer = response['choices'][0]['message'].strip()  # Get the response text
            except Exception as e:
                print(f"Error with OpenAI API: {e}")
                answer = "There was an error with the API."

    return render_template("index.html", answer=answer)

if __name__ == "__main__":
    app.run(debug=True)
Describing the app.py file code:
In line: 11: app = Flask(__name__): is used to create a Flask web application instance. Let’s break it down:
Flaskis a class from the Flask framework, used to build web applications in Python.__name__is a special Python variable that represents the name of the current module (script).- Passing
__name__tells Flask where to locate resources, templates, and static files.
In line: 20:
messages <span class="token operator">=</span> <span class="token punctuation">[</span>
                 <span class="token punctuation">{</span><span class="token string">"role"</span><span class="token punctuation">:</span> <span class="token string">"user"</span><span class="token punctuation">,</span> <span class="token string">"content"</span><span class="token punctuation">:</span> question<span class="token punctuation">}</span>
            <span class="token punctuation">]</span>
creates a list containing a dictionary. Here’s a breakdown:
messages→ A variable that holds a list.[ ... ]→ Square brackets indicate a list.{ "role": "user", "content": question }→ A dictionary inside the list with two key-value pairs:"role": "user"→ A key"role"with the value"user", often indicating that this message was sent by the user."content": question→ A key"content"with the value of thequestionvariable, which likely holds some text.
In line: 25:
response <span class="token operator">=</span> client<span class="token punctuation">.</span>chat<span class="token punctuation">.</span>completions<span class="token punctuation">.</span>create<span class="token punctuation">(</span>
                    model<span class="token operator">=</span><span class="token string">"gpt-3.5-turbo"</span><span class="token punctuation">,</span>  <span class="token comment"># Or another available model</span>
                    messages<span class="token operator">=</span>messages<span class="token punctuation">,</span>
                    max_tokens<span class="token operator">=</span><span class="token number">150</span><span class="token punctuation">,</span>
                    temperature<span class="token operator">=</span><span class="token number">0.7</span>
                <span class="token punctuation">)</span>
This line sends a request to OpenAI’s API (or a similar AI model API) to generate a chat completion based on the provided conversation history.
Breakdown:
-
client.chat.completions.create(...)- This calls the API to generate a chat completion using OpenAI’s GPT-3.5 Turbo model.
clientis an instance of an API client, typically created withopenaior another library.
-
model="gpt-3.5-turbo"- Specifies which AI model to use (e.g.,
"gpt-3.5-turbo"or"gpt-4").
- Specifies which AI model to use (e.g.,
-
messages=messages- Provides the conversation history as a list of dictionaries (like the one we discussed earlier).
-
max_tokens=150- Limits the length of the AI’s response to 150 tokens (where a token is roughly a word or punctuation mark).
-
temperature=0.7- Controls randomness in the response:
- Lower values (e.g., 0.2) → More deterministic and focused answers.
- Higher values (e.g., 0.9) → More creative and varied responses.
- Controls randomness in the response:
-
Why
temperature=0.7?The
temperatureparameter controls the randomness of the AI’s responses:- Lower values (e.g.,
0.2) → More deterministic, structured, and repetitive responses. - Higher values (e.g.,
0.9) → More creative, varied, and sometimes unpredictable responses. 0.7is a good balance between creativity and coherence, which is why it’s often used as a default.
You can change it to another value based on how you want the AI to behave.
Note can’t change the name from temperatrure to other.
In line: 31:
- Lower values (e.g.,
answer <span class="token operator">=</span> response<span class="token punctuation">[</span><span class="token string">'choices'</span><span class="token punctuation">]</span><span class="token punctuation">[</span><span class="token number">0</span><span class="token punctuation">]</span><span class="token punctuation">[</span><span class="token string">'message'</span><span class="token punctuation">]</span><span class="token punctuation">.</span>strip<span class="token punctuation">(</span><span class="token punctuation">)</span>It extracts and cleans up the AI’s response from the API call.
Breaking It Down:
-
response['choices']- The API response contains a list of choices.
- Normally, there’s only one choice (at index
0), but sometimes multiple responses can be generated.
-
response['choices'][0]- Accesses the first response choice.
-
response['choices'][0]['message']- Retrieves the AI’s actual response message.
-
.strip()- Removes leading and trailing spaces or newlines to ensure a clean output.
The code above uses index.html file ( described in the following) user can asks question, then gives answer by using the AI model ChatGPT. I case some error happens then prints out the error.
Create a folder named templates in the same directory as app.py, then create an index html file in this directory and paste the following code to it.
<!DOCTYPE html>
<html lang="en">
<head>
  <meta charset="UTF-8">
  <title>Question Answering App</title>
  <style>
    body { font-family: Arial, sans-serif; margin: 2em; }
    input[type="text"] { width: 300px; padding: 8px; }
    button { padding: 8px 12px; }
    .answer { margin-top: 1.5em; padding: 1em; background: #f0f0f0; border-radius: 4px; }
  </style>
</head>
<body>
  <h1>Ask a Question</h1>
  <form method="post">
    <input type="text" name="question" placeholder="Type your question here" required>
    <button type="submit">Ask</button>
  </form>
  {% if answer %}
    <div class="answer">
      <h2>Answer:</h2>
      <p>{{ answer }}</p>
    </div>
  {% endif %}
</body>
</html>
Running the App
check that you have installed Python (>python –version) if not installed install python.
before running the App Install dependencies:
- >pip install flask
- >pip install openai
open command prompt in the folder where your app.py is and run as following:
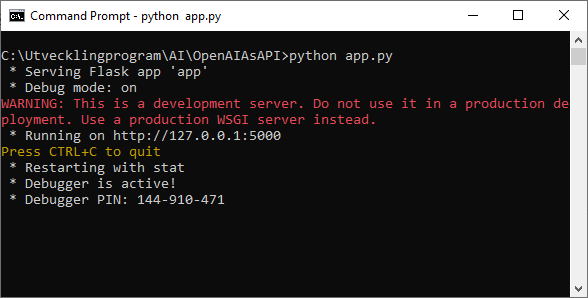
If no error in the code then you see the an url: http://127.0.0.1:5000
Open your browser with url: http://127.0.0.1:5000 then write your question as seen in the following image:

when you have write your question then press to the Ask button, then your application communicates with ChatGPT and find the answer and writes for you.
Note that you should have sufficient quota, in the OPENAI platfrom (check in the https://platform.openai.com) and check the section Pricing. otherwise your app can write error like as : Error with OpenAI API: Error code: 429 – {‘error’: {‘message’: ‘You exceeded your current quota, please check your plan and billing details.
Source code is on myGithub
Conclusion
In this article, we have given how to use OPENAI as API for your application in Python language.
My next post is : How to create AI APP
TThis post is part of AI (Artificial Intelligence) step by step